
How to Repair Cracked Roof Tiles: When to Seal or Replace Them
The most reliable way to repair cracked roof tiles is usually to replace the damaged tile with one that has the same profile and interlocking shape. A fine, stable crack may sometimes be sealed temporarily, but a tile that is split, loose, missing a section or allowing water through should normally be replaced.
Do not climb onto a wet, steep, brittle or high roof to inspect the damage. In many cases, you can check the tile from the ground or inside the roof space before deciding whether temporary sealing, replacement or an inspection by a roofer is needed.
Quick summary – When to Seal, Replace or Call a Roofer
- Replace a roof tile when the crack passes through the tile, affects an edge or water channel, leaves material missing or allows the tile to move.
- Use compatible roof-grade sealant only as a temporary measure when the tile remains stable, correctly positioned and otherwise intact.
- Check nearby tiles, sarking and roof battens because the visible crack may not be the only source of water entry.
- Do not attempt roof work when the surface is wet, steep, brittle, difficult to access or more than one storey high.
- Arrange a professional inspection when several tiles are damaged, the leak returns or the roof shows signs of movement, sagging or broader deterioration.
Should a Cracked Roof Tile Be Sealed or Replaced?
A structurally cracked or broken roof tile should normally be replaced. Sealant may temporarily reduce water entry, but it will not restore the tile’s original strength, fit or ability to direct water down the roof.
Tiles that are displaced but otherwise undamaged can usually be returned to their correct position.
| Tile condition | Recommended action | Reason |
| Surface mark with no visible split | Inspect and monitor | The mark may be cosmetic |
| Fine, stable crack with no missing material | Plan replacement; temporary sealing may be suitable | The crack may widen |
| Crack running through the tile | Replace | The tile has lost strength |
| Crack affecting an edge or water channel | Replace | Overlap and drainage may be affected |
| Missing corner or broken section | Replace | Water and debris can enter |
| Tile split into separate pieces | Replace promptly | Pieces may shift or fall |
| Tile has slipped but is not cracked | Reposition and refix | Replacement may not be necessary |
| Several nearby tiles are damaged | Arrange an inspection | There may be a wider roof issue |
When Can a Cracked Tile Be Sealed?
Temporary sealing may be considered when the crack is fine, no part of the tile is missing and the tile remains correctly aligned. The side edges, overlapping sections and water channels must also remain intact.
Where temporary sealing is considered suitable and the tile can be reached safely, a compatible flexible roof-grade sealant may be applied sparingly along the crack. The surface normally needs to be clean and dry, and the sealant must not cover the tile’s drainage channels or interlocking edges.
Sealant should not be used as a permanent repair when:
- The crack passes through the full tile.
- The tile is loose or split into separate pieces.
- A corner, edge or water channel is missing.
- The tile has moved out of position.
- Water is already entering the roof space.
- Nearby tiles or supporting materials are also damaged.
General-purpose silicone, expanding foam, mortar and roof paint should not be treated as substitutes for a correctly fitted replacement tile. These products may hide the crack without restoring the tile’s strength or proper fit.
How Can You Identify and Assess a Cracked Roof Tile?
Start by checking the roof from the ground and looking for signs of water entry inside the home. You do not always need to walk on the roof to confirm that a tile needs attention.
From the ground, look for a visible line through a tile, a missing corner, an uneven row or a tile that has slipped down. Fresh fragments in the gutter can also indicate recent damage. Check areas below overhanging branches and around solar panels, antennas, skylights and vents, especially if contractors have recently accessed the roof.
Binoculars or a camera with zoom can help you inspect the area more closely without climbing onto the roof.
Inside the home, signs of water entry can include:
- Water stains on ceilings or cornices
- Wet insulation
- Damp or stained roof timbers
- Water marks on the sarking
- Tile fragments above the ceiling
- Moisture near a valley, wall, skylight or vent
- Daylight visible through an unexpected gap
Only enter the roof space when it is safe and accessible. Stay clear of wet electrical fittings, unstable ceiling sections and materials that may contain asbestos.
Check the Depth and Position of the Crack
A surface scratch is different from a structural crack. The tile should usually be replaced if the crack is visible from both sides, the two sections move separately, loose fragments are present or light and moisture can pass through.
The crack is also more concerning when it reaches:
- A side edge
- An interlocking section
- A raised water channel
- The upper or lower end of the tile
- A valley or roof penetration
- A section that is no longer properly supported
Damage to an edge or channel can affect how the tile overlaps with the tiles beside it and how rainwater moves down the roof.
Check Whether the Tile Has Moved
A cracked tile that remains in position may still provide limited temporary protection. A tile that has lifted, slipped or separated can expose the sarking and roof space more directly.
Movement may be caused by a failed clip, nail or screw, broken locating lugs beneath the tile, strong winds, poor installation or movement in the roof structure. It can also happen when someone steps on the wrong part of the tile.
Check the Surrounding Area
One cracked tile may be caused by a single impact. Several cracks in the same area may point to storm damage, careless foot traffic, brittle tiles or movement in the roof battens or framing.
Water can travel along battens, rafters, insulation or sarking before appearing as a ceiling stain. The place where water becomes visible inside the home may not sit directly below the cracked tile.
Is It Safe to Repair a Cracked Roof Tile Yourself?
Roof access is often more dangerous than the tile repair itself. Tiled roofs can be slippery, and nearby tiles may crack when weight is placed on an unsupported section.
Do not attempt the repair when:
- The roof is wet, mossy or slippery.
- Rain or strong winds are forecast.
- The roof has a steep pitch.
- The damaged tile is near an edge, ridge or valley.
- The home is more than one storey high.
- The tiles are old, brittle or moving under light pressure.
- You do not have suitable access and fall protection.
- The ladder cannot be secured properly.
- Electrical cables or solar equipment are nearby.
- The ceiling or roofline appears to be sagging.
- You cannot identify where it is safe to place your weight.
WorkSafe WA guidance on falls from roofs recommends assessing fall risks and putting suitable controls in place before roof work begins.
Safe Work Australia’s roof safety guidance also identifies working at height, roof access, fragile roofing, electricity, falling objects and exposure to heat as common hazards.
Monier advises that tile replacement and roof work should be handled by a qualified roofing professional because walking on a tiled roof can damage the tiles and place the person accessing the roof at risk.
Stop if the Roofing Material May Contain Asbestos
Concrete and terracotta roof tiles generally do not contain asbestos. However, some older Australian roofs may include asbestos-cement sheets, shingles or associated roofing components that can be difficult to identify by sight alone.
According to the Asbestos and Silica Safety and Eradication Agency, a home built or renovated before 1990 may contain asbestos.
Do not cut, drill, grind, sand, break or pressure clean suspected asbestos materials. If you are unsure what the roofing material contains, arrange professional testing or assessment before disturbing it.
How Do You Find the Right Replacement Roof Tile?
The replacement tile must match the profile, dimensions and interlocking shape of the existing tile. A close colour match is useful, but correct fit and water flow are more important.
Start by checking whether spare tiles were left at the property. They may be stored in a garage, shed, roof space or beside the home. Inspect any spare tile carefully because a tile that is already cracked, warped or heavily chipped should not be installed.
When identifying a replacement, record the tile’s length, width, flat or curved profile, water-channel shape, side interlocking edges, fixing holes and locating lugs underneath. Check for a manufacturer’s name, stamp or product code.
Clear photos of the front, back and side can help a roofer or reclaimed tile supplier identify the correct profile.
Do not force a similar-looking tile into place. A tile with the wrong shape or dimensions may:
- Leave gaps between adjoining tiles
- Block a water channel
- Sit higher than the surrounding row
- Reduce the required overlap
- Place pressure on neighbouring tiles
Older roof tile profiles may no longer be manufactured. A reclaimed matching tile may be needed when new stock is unavailable.
How is a Cracked Roof Tile Replaced?
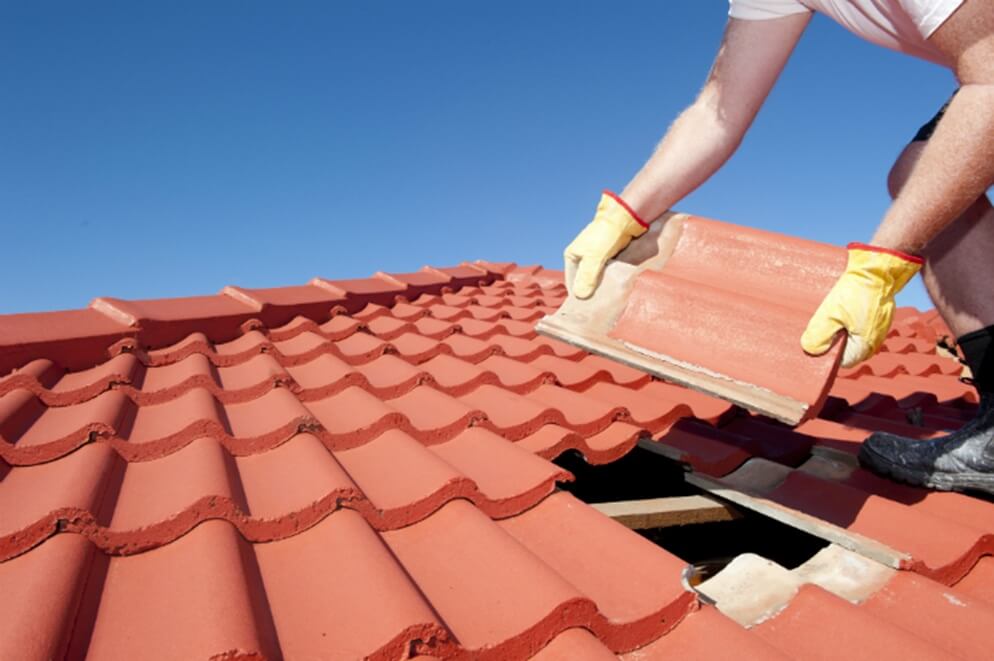
A cracked roof tile is replaced by carefully lifting the overlapping tiles, removing the damaged tile, checking the materials underneath and fitting a matching replacement. The exact process depends on the tile profile and whether the tile is loose, nailed, clipped or screwed in place.
1. Confirm the Type of Tile
Tiles across the main roof surface are replaced differently from ridge caps, hip caps and tiles cut around valleys, walls or roof penetrations such as skylights, vents and service pipes.
A cracked ridge cap or valley tile may require additional pointing, bedding, flashing or fixing work.
2. Check the Replacement Tile
The replacement should match the existing tile’s profile, size, side edges, drainage channels, overlap, fixing points and locating lugs. It should sit naturally within the surrounding row without being forced.
3. Lift the Surrounding Tiles
The tiles above and beside the damaged tile usually need to be raised carefully so the broken tile can be released.
Too much pressure can crack nearby tiles, especially on an older terracotta roof.
4. Remove the Damaged Tile
Any nail, clip or screw holding the tile in place is released before the broken tile is removed from beneath the overlapping row.
Loose fragments should not be left under the replacement tile or allowed to fall into the roof space or gutter.
5. Inspect the Area Underneath
Before fitting the replacement, the roofer should check for:
- Damaged roof battens
- Torn or deteriorated sarking
- Water staining
- Rusted fixings
- Loose clips
- Mould or timber decay
- Debris beneath the tiles
- Broken lugs on nearby tiles
Replacing the visible tile may not resolve the leak if the sarking, battens, fixings or surrounding tiles are also damaged.
6. Fit and Secure the Replacement
The replacement tile should align with the surrounding row, sit flat without rocking and maintain the correct overlap. Its water channels must remain clear, and the tile should not press heavily against the tiles beside it.
Where a mechanical fixing is required, the tile should be secured using a suitable clip, nail or screw rather than relying on adhesive alone.
Concrete and terracotta tiles follow the same general replacement process, although older terracotta tiles may be more brittle and need gentler handling.
7. Reposition the Surrounding Tiles
Every tile lifted during the repair must be returned to its correct position. A nearby tile left raised, twisted or separated can create another point of water entry.
Monitor the area after the next suitable rainfall. Moisture already held in insulation or timber may take time to dry, so continue checking the ceiling and roof space.
What if the Cracked Tile Is Near a Roof Junction?
A cracked tile near ridge capping, a roof valley, flashing, a skylight or another roof penetration may not be the only cause of water entry.
For example, water may be entering through deteriorated pointing, damaged flashing or a blocked valley before travelling beneath the tiles. Replacing the visible tile may therefore not stop the leak.
Arrange a professional inspection when the damage is close to one of these areas, particularly if the leak continues after the tile has been replaced.
What Should You Do if a Cracked Roof Tile is Leaking?
Protect the inside of the home first and wait for safe conditions before anyone accesses the roof. One cracked tile can allow water beneath the tiled surface, particularly during heavy or wind-driven rain.
Take these steps:
- Move furniture, electronics and valuables away from the affected area.
- Place a bucket or waterproof container under active drips.
- Use towels to stop water spreading across hard floors.
- Keep people away from sagging or waterlogged ceiling sections.
- Do not touch wet light fittings, switches or electrical equipment.
- Turn off the affected electrical circuit when it is safe to do so.
- Photograph the ceiling damage and visible water.
- Check the roof from the ground only.
- Contact a roofer for temporary weatherproofing or permanent repair.
- Contact your insurer if sudden storm damage may be involved.
Do not climb onto the roof while it is raining, windy or still wet.
A cracked tile may not leak during every shower. Water entry can depend on wind direction, rainfall intensity, roof pitch, the crack’s position and the condition of the sarking beneath the tiles.
What Causes Roof Tiles to Crack?
Roof tiles commonly crack because of foot traffic, storm impact, ageing, poor installation or movement in the roof structure.
Walking on an unsupported section of a tile can cause it to crack. This damage may happen during solar panel installation, antenna work, gutter cleaning, air-conditioning work, roof painting or inspections. A line of damaged tiles can sometimes show the path someone took across the roof.
Branches, hail and wind-blown debris can also crack or dislodge tiles. After a storm, the surrounding area should be checked rather than replacing only the most obvious damaged tile.
Older tiles can become more difficult to lift without cracking nearby pieces. Age does not automatically mean the entire roof requires replacement, but brittle tiles need careful access and handling.
Cracks that continue to appear in the same location may be caused by movement in the roof battens or framing, incorrect tile spacing, unsupported edges, poor alignment or excessive pressure from a fixing.
Future damage can be reduced by limiting unnecessary roof access, trimming overhanging branches, keeping valleys and gutters clear, checking the roof after other trades have completed work and storing several sound matching tiles for future use.
When Should a Roofer Inspect Cracked Roof Tiles?
Arrange a professional inspection when the problem cannot be safely or confidently treated as one isolated damaged tile.
A roofer should inspect the roof when:
- The tile cannot be reached safely.
- The roof is steep or more than one storey high.
- Several tiles are cracked or displaced.
- The roof is old or brittle.
- The crack has caused an active leak.
- The leak returns after a tile has been replaced.
- Damage is close to ridge capping, a valley, wall or penetration.
- Roof battens or sarking appear damaged.
- Ridge capping is loose or moving.
- The ceiling or roofline is sagging.
- Storm damage affects a wide area.
- Electrical or solar equipment creates an additional risk.
- The roofing material may contain asbestos.
- Replacement tiles continue cracking in the same location.
Repeated cracking can be caused by an incorrect tile profile, unsupported edges, damaged battens or movement in the roof. Replacing the visible tile without identifying the underlying cause may lead to the same problem happening again.
Get Cracked Roof Tiles Properly Assessed
A single cracked roof tile can often be replaced without extensive work, but the surrounding tiles, fixings and materials underneath should also be checked.
Perth Roofing & Gutters can inspect damaged roof tiles, identify the likely source of water entry and determine whether the problem requires a simple tile replacement or more extensive roof repairs.